TBL Online Course Archive
The Getting Started with Team-Based Learning workshop has guided you through four modules that introduced you to the four essential elements of Team-Based Learning (TBL) and then guided you to begin creating your own course materials.
This page will provide you with more permanent access to course materials; worksheets, handouts, readings and videos. You are free to use, reuse, and share these materials. I am OK with you giving a course yourself based on these materials. I only ask that the materials are ONLY used for educational, non-commercial purposes.
All the course modules have the same rhythm of activities
Most readings are from my book – Getting Started with Team-Based Learning
- Preamble – context setting
- Readings
- Video about module content
- Self-test questions
- Assignment supported by worksheet, guidelines, worksheet exemplar and supporting documents
- Video introducing worksheet
- Students submit worksheet in discussion forum
- Course coach reviews worksheets, provides feedback and returns in discussion forum
- Student read and review each other’s worksheets
16-20 hours of student effort are required across the 2 week course to complete it successfully.
Typical cohort is 10 students.
Course Open
Posting Introduction in Discussion Forum
One the most important things to get your course started well. Typically, student are asked to introduce themselves in the discussion forum. You can have a wide variety of question prompts – tell us about your discipline, your teaching, your hopes, dreams and concerns, what are you hoping to take away from course.
It is important to be very AVAILABLE as a facilitator….be in first…introduce yourself…quickly respond as people post…try to get students to respond to each other…point out people that are in similar disciplines…or have similar questions that could become an editing buddy after the course is over. when you get students interacting with other student – camaraderie and cohort are enhanced – and course has much more energy and interaction.
Really work hard at this…the tone that is set at beginning often controls how the whole course unfolds.
Module 1 - TBL Course Design
Module Preamble
Module Learning Objective
- Understand the 4 essential elements of Team-Based Learning (TBL)
- Apply backwards design principles to develop aims and learning outcomes that will guide TBL module development
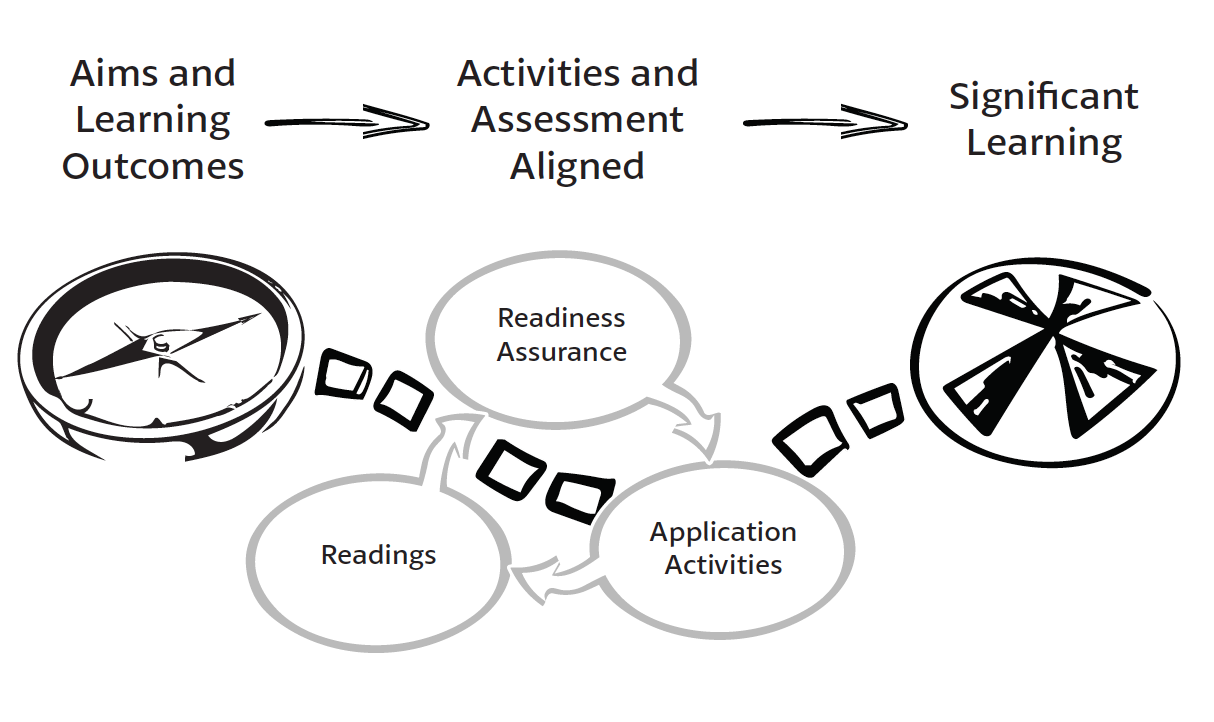
This module will introduce you to the 4 essential elements of TBL and why backwards design is vital 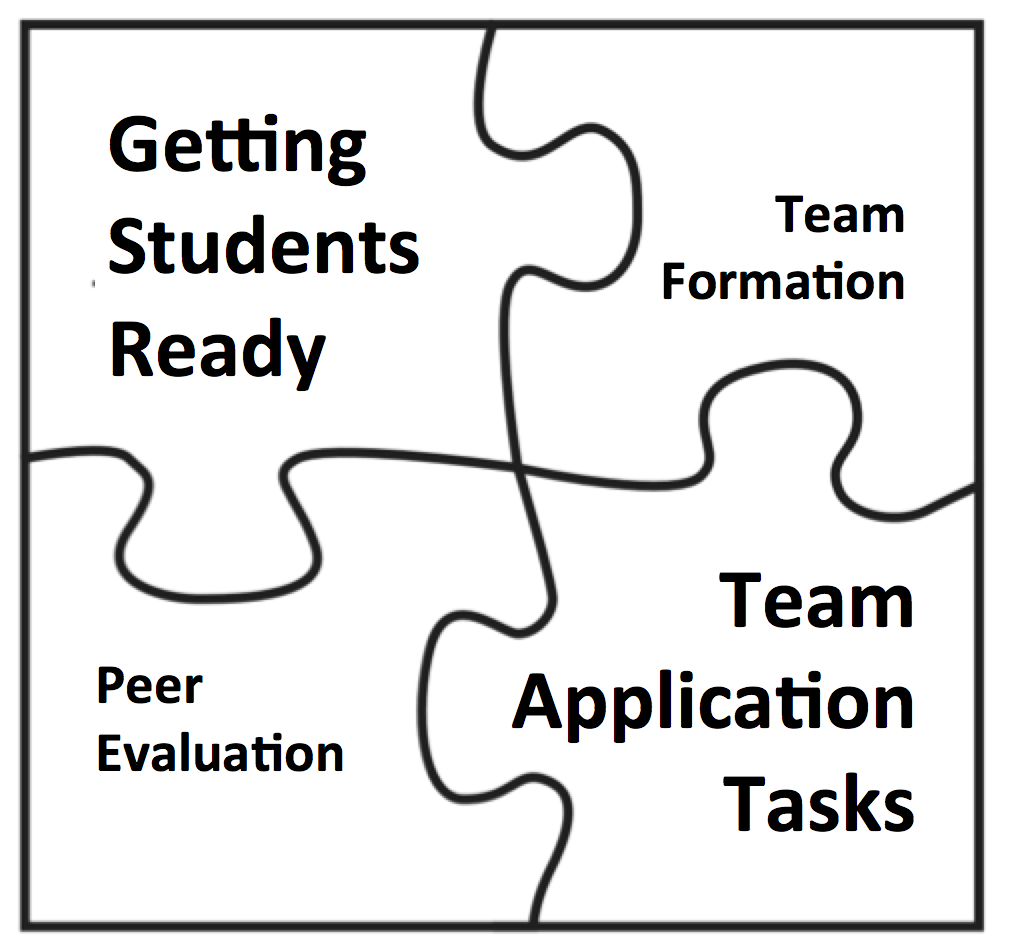 for creating Significant learning experiences. In this module, we will focus on helping you clearly understand what you want our students to be able to do at end of module and course. By clearly understanding exactly where we want students to get to, we are in a better position to design a sequence of learning activities that build to this culminating student performance and Significant Learning.
This module will focus on starting your course design. We will use both Fink’s ideas of Significant Learning and McTighe and Wiggins Backwards Design. The goal of this module is to connect your intentions (aims) with what your students will achieve (Learning Outcomes). You need this clarity of Learning Outcomes to design the progression of team tasks that lead to the modules culminating task. Spending time getting our intended outcomes crystal clear is worth the time. They guide students during learning activities. They also guide the teacher during course development and learning activities. When we know where we are going we are in a much better position to gently guide students towards the desired outcomes. The saying goes – if you don’t know where you are going – how will you know when you get there.
Using the Initial Design Decisions – guidelines and worksheet and the Bloom’s Taxonomy Action Verbs handout for this module you will consider the context of your course, identify important situational factors, and then develop a module aims, that will then be used to develop clear Learning Outcomes that will guide you in the development of a complete TBL learning module.
Module Tasks (2.5 hours)
- Reading Assignment (60 minutes)
- Course Design Video (6 minutes)
- Application Assignment (60 minutes)
- Discussion Forum (20 minutes)
These readings will introduce you to backward design, significant learning, and provide an overview of the 4 essential elements of Team-Based Learning. These readings should take approximately 90 minutes to complete.
Readings
Reading One
12 pages
This chapter provides a broad overview of Team-Based Learning. The reading first defines what TBL is and how it is different from other forms of Collaborative and Cooperative Learning. Next we hear the story of TBL’s founder – Larry Michaelsen and his first classroom experiences using the TBL framework he created. It is worth noting the challenges he was faced with and how the structures he created overcame these challenges. The next section on the chapter examines what are known as the 4 essential elements of TBL:
- Properly forming and managing teams
- Using the Readiness Assurance Process (RAP)to ensure pre-class preparation
- Using 4S team tasks to help students learn how to apply course concepts
- Accountability and Evaluation
The chapter closes with a brief description of the rhythm of a typical TBL course.
- Read Getting Started with Team-Based Learning p 3-15
Reading Two
3 pages
The first reading is a short article by Grant Wiggins and Jay McTighe. The tag line really captures what the article is about: Why “backwards” is best. The article makes case for deliberate and intentional instructional design where we shift from the “time honored” course design methods of focusing on inputs, organizing topics, and covering the required content to thinking about the results we want for our students. The article presents the three stages of backwards design and closes with advice about getting the assessment “right” and not tagging on assessments as a last step after we have already designed the learning activities. We have to remember that for many students the assessment is the curriculum.
If these ideas interest you, you can explore them further in Wiggins and McTighe excellent book – Understanding by Design (Links to an external site.).
- Read Backwards Design article (Links to an external site.) by Edutopia
Reading Three
3 pages
In this excellent article, Roberson and Franchinni eloquent expand on the idea of key actions by helping us see that “our disciplines are more defined by the actions of disciplinary experts than by a body on content”. We can use these “typical” disciplinary actions to create compelling classroom activites where students concretely use the abstract ideas and concepts that they have learned from the readings and Readiness Assurance Process.
This reading is just a 3 page section of this paper (You will read entire paper in next module). The reading starts at the bottom of page 277 (Course Design, Task Design, and Disciplinary Thinking section). The reading ends at bottom of page 280. It will help you make more concrete Learning Outcomes that really capture disciplinary ways of knowing and the way disciplinary experts make decisions.
- Read Roberson, B., & Franchini, B. (2014). Effective task design for the TBL classroom. Journal on Excellence in College Teaching, 25(3&4), 277-280.
Worksheets
Time to begin completing this modules worksheet.
In this Initial Design Decisions guidelines and worksheet, you will begin to imagine your course module. The situational factors you might need to consider, your aims, begin imagining 4S possibilities and writing Learning Outcomes. You should spend about 60 minutes completing this worksheet.
To help you understand how to use this worksheet, here is a worksheet exemplar from a module development on “Learning Theory”.
Instructions
When you complete your worksheet, be sure to
1. SAVE it to your desktop or elsewhere on your computer. Include your last name and assignment in the filename. EXAMPLE: “Jones-Mod 1 Worksheet”
2. SUBMIT your worksheet. (You should see a rectangular blue “submit” button in the upper left corner of your screen.) This will enable your workshop coach to provide individual feedback to you.
3. POST your worksheet to the Discussion Forum in the module. This enables your colleagues to post feedback to you and you to provide feedback to them on their worksheets.
“How To” Help
How do I submit an assignment? (Links to an external site.)
How do I view assignment comments from my coach? (Links to an external site.)
Supporting Documents
- M1 Worksheet
- Worksheet Guidelines
- Worksheet exemplar
- Bloom’s Taxonomy Action Verbs
Module 2 - Developing 4S Team Tasks
Module Preamble
Module Learning Objectives
- Write a well constructed 4S team task application activity
This module will introduce you to the TBL 4S framework and how to design effective team tasks. Team-Based Learning always uses the 4S framework to structure team decision-making activities. The main focus 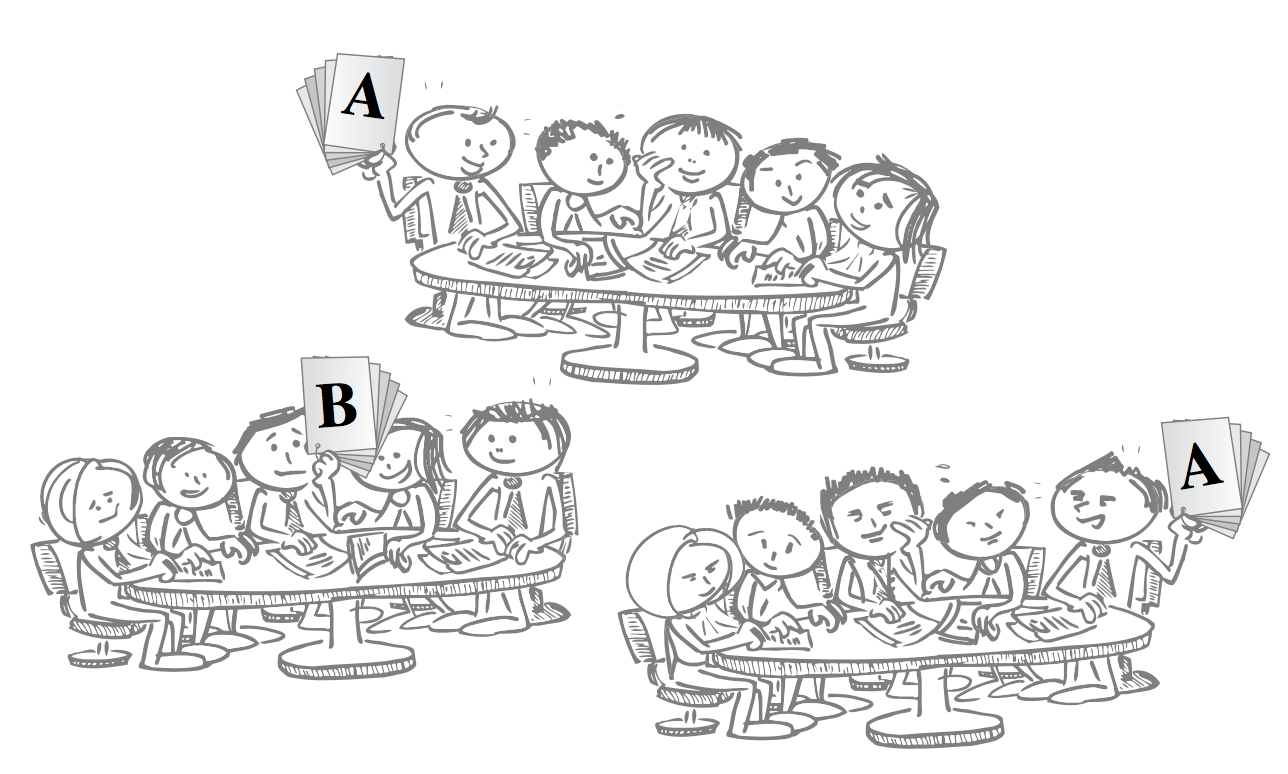 of TBL courses is to help students learn how to use the course concepts to solve authentic, messy disciplinary problems. Understanding the grammar (Peters, 1973) of our discipline lets us design activities which help students build their disciplinary problem-solving skills and their disciplinary ways of knowing.
The great news about TBL is that it scales really well to large classes. Because the reporting of the 4S activities is based on students giving other students feedback – more students actually improve the depth of the conversation.
The 4 S’s
Significant problem – we should use complex problem scenario that includes incomplete or contradictory information. This make the diversity of perspectives in the team an asset in making the difficult discrimination of the best course of action.
Same problem – having all teams work on the same problem will lead to greater engagement and investment because students know that other students will have understanding of the issues and be in a position to critique their decision.
Specific choice – require that team members all come to agreement on a single, clearly-defined best course of action in light of potentially vague or conflicting information.
Simultaneous reporting – responses in the form of a specific choice (the previous “S”) makes simultaneous reporting possible. Simultaneous reporting encourages team accountability, since each team knows their response will be available for all to see, and no team wants to stand out with an unreasonable, hastily-chosen answer.
There is a subtle, but extraordinary feedback and accountability process as part of the whole class simultaneous report and discussion…..If your team didn’t listen to an important internal minority opinion or a majority of team members were bullied by a dominating member into a choice, these poor choices often come to light during the whole class reporting discussion. The team members will understand that they committed an error in listening and team process. This self-correcting feedback can automatically improve the team dynamics in subsequent activities.
Your task in this module is to write your first 4S activity.
Module Tasks (3.5 hours)
Complete readings and watch videos (2:00)
Post completed 4S worksheet, review and respond to colleagues post (1:30)
Readings
These reading will introduce you to Team-Based Learning’s unique 4S problem-solving framework, classroom logistics, and how to design great tasks for teams. These readings will take approximately 2 hours to complete.
Reading One
This first short reading introduces you to a short overview of how to implement Team-Based Learning by first identifying key actions we want the students to engage in and how identifying these will eventually allow you to design an well integrated TBL learning sequence.
- Read Getting Started with Team-Based Learning p 16-22
Reading Two
In this excellent article, Roberson and Franchinni eloquent expand on the idea of key actions by helping us see that “our disciplines are more defined by the actions of disciplinary experts than by a body on content”. We can use these “typical” disciplinary actions to create compelling classroom activites where students deeply engage with the discipline.
- Read Roberson, B., & Franchini, B. (2014). Effective task design for the TBL classroom. Journal on Excellence in College Teaching, 25(3&4), 275-302.
Reading Three
This chapter examines more the closely the TBL classroom experience, the structure of 4S activities, how to effectively structure classroom time using the SET-BODY-CLOSE lesson planning model, how to facilitate reporting discussions, and finally some different strategies for having teams simultaneously report their decisions.
- Read Getting Started with Team-Based Learning p 114-132
Worksheets
Time to begin completing this modules worksheet.
Using the Create a 4S Task guidelines and worksheet, you will write/compose/create your first 4S activity. You should spend about 75 minutes completing this worksheet.
To help you understand how to use this worksheet, here is a worksheet exemplar from a module development on “Learning Theory”.
Instructions
When you complete your worksheet, be sure to
1. SAVE it to your desktop or elsewhere on your computer. Include your last name and assignment in the filename. EXAMPLE: “Jones-Mod 2 Worksheet”
2. SUBMIT your worksheet. (You should see a rectangular blue “submit” button in the upper left corner of your screen.) This will enable your workshop coach to provide individual feedback to you.
3. POST your worksheet to the Discussion Forum in the module. This enables your colleagues to post feedback to you and you to provide feedback to them on their worksheets.
“How To” Help
How do I submit an assignment? (Links to an external site.)
How do I view assignment comments from my coach? (Links to an external site.)
Supporting Documents
- M2 Worksheet
- Worksheet Guidelines
- Worksheet exemplar
Module 3 - Getting Students Ready
Module Preamble
Module Learning Objective
- Draft a RAP test by first, establishing important concepts to test, then selecting an appropriate reading, and finally writing some well constructed MCQ questions
This module will introduce you to TBL’s Readiness Assurance Process (RAP). The RAP process ensures 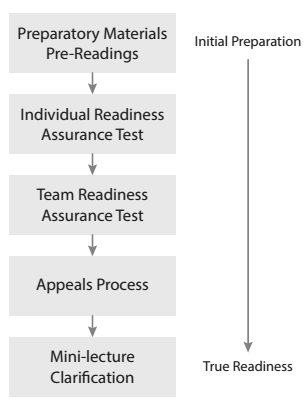 students come to class prepared and then uses the power of social learning to transform that initial individual preparation into true team readiness to begin problem-solving (4S activities). The RAP prepares students for the activities that follow. It is not about testing. Students will become very upset if the RAP is presented just another assessment strategy, rather than preparation for the activities that follow. If the RAP process is not carefully integrated with the activities that follow, you can expect the unhappy student cry of “Testing before teaching makes no sense!” It’s the synergy between the crystal-clear objectives of the instructional sequence, the Readiness Assurance Process, and the Team Application Tasks that follow that gives TBL much of its instructional power.
You might wonder way this module didn’t come before module 2. Backwards Design requires us to first define the outcomes, which then lets us consider the kind of learning environment and student performance opportunity we need to create, and this finally leads back to what do we need to provide to get students ready. So, first you need to identify the learning outcome/objective, then create a performance (4S team task) where students learn how to apply the course concepts, and then select readings and develop a RAP test. You develop a RAP test based on your selected readings and the concepts you know your students will need to know to successfully begin problem-solving.
Module Tasks (3.5 hours)
- Reading Assignment (30 minutes)
- Video (7 minutes)
- Application Assignment (90 minutes)
- Discussion Forum (15 minutes)
Readings
This reading will introduce you to the Team-Based Learning Readiness Assurance Process (RAP) and how to construct good multiple-choice questions for the RAP tests. The reading will take approximately 2 hours to complete.
The reading begins with an overview of the the 5 stages of the Readiness Assurance Process.
- Pre-class preparation
- Individual Readiness Assurance test (iRAT)
- Team Readiness Assurance test (tRAT)
- Appeals Process
- Mini-lecture or clarification
Each stage of the RAP is described in detail. The next section of the reading examines the “educational power” of each RAP stage so you can better understand how the RAP process works and why it is so powerful. Next the readings focuses on the development process for the RAP tests by first discussing test drafting and then focusing on how to write good multiple-choice questions.
- Read Getting Started with Team-Based Learning p 74-96
When you construct your own multiple-choice questions, you will likely want to refer back to the reading and the “Writing Good Multiple Choice Questions” section (page 91-96) and these supporting documents.
- Bloom’s verbs handout
- MCQ writing checklist
- MCQ flaws article
MCQ Writing Tips
Identifying Test Worthy Items
Once you have selected readings for the week’s preparation, skim the readings and make a list of critical ideas that student need to get from the preparatory materials to be ready for team tasks. After skimming, you can do a slower read, listing important concepts, definitions, and ideas that the student need to get started. You use this list both to develop questions that check students understanding of critical concepts, principles, factual understanding, laws, rules, etc. and also use this to develop preamble/wrapper for reading, so students know what to pay attention to.
Writing Multiple-Choice Questions
The RAP test should be a mix of Bloom’s levels,with approximately 30% remembering (did you do the readings?), approximately 30% understanding (did you understand what you read?), and finally, 40% application,. The application questions can be in the form of “which concept applies to this situation” (are you ready to use what you have read?). To use a book analogy, you want to write these tests more at the table-of-contents level then at the index level.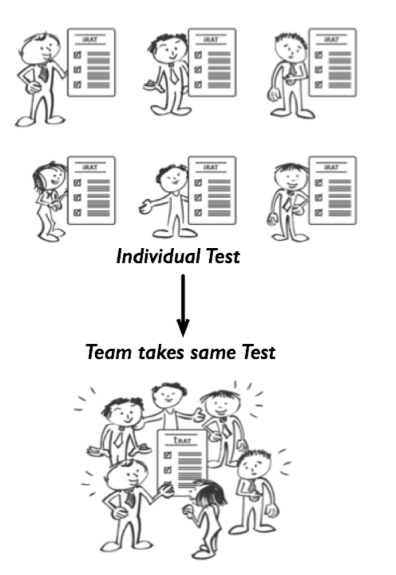
You can include a few simpler questions that just provide simple accountability that the student has completed the readings. Try to ask about topics that students are likely to interpret incorrectly. Test common misconceptions that might undermine students’ ability to successfully begin problem-solving. You can ask which concept applies to a given situation or scenario. You can focus on the relationship between concepts; this is an efficient way to test two concepts at once.
Some Rules for Question Writing
For good question stems, consider following rules:
- Stems should be stand-alone questions.
- Stems should be grammatically complete.
- Negative stems should be used with caution.
- If a key word appears consistently in the options, try to move it to the stem.
- Word the stem such that one option is indisputably correct.
For creating good options, consider following rules:
- Make sure each incorrect option is plausible but clearly incorrect.
- Make sure that the correct answer (keyed response) is clearly the best.
- Avoid, if possible, using “all of the above”.
- Use “none of the above” with caution.
- Try to keep options similar lengths, since test-wise students will pick the longest option if unsure (too long to be wrong).
- Make sure options are grammatically consistent with the stem (question leader) and use parallelism.
- Make sure that numerical answers are placed in numerical order, either ascending or descending.
Well-constructed multiple-choice questions are not easy to create. But the quality of the multiple-choice questions you use in your Team Test can make or break the tone of your class. Nothing is more uncomfortable than rushing poor questions to the classroom and having to endure the inevitable student backlash. Good questions are absolutely essential to our success, and putting in the effort to write good questions is worth your time and attention.
Spend time reviewing and revising your questions. It can be very helpful to have a colleague look at your questions. When we write them we are often too close to see all the mistakes. Just like good writing is about good editing, good questions are about reflection and revision.
Please review these documents before completing the RAP worksheet
- Bloom’s Verbs for writing MCQ’s
- MCQ writing checklist
- MCQ flaws article
Worksheets
Time to begin completing this module’s worksheet.
In the RAP guidelines and worksheet, you will begin identify appropriate pre-readings, topics students need to be tested on during RAP and finally you will begin to write multiple-choice questions for the RAP. You should spend about 75 minutes completing this worksheet.
To help you understand what we are trying to achieve with this worksheet, here is a worksheet exemplar from the module I am developing on “Learning Theory”
Instructions
When you complete your worksheet, be sure to
1. SAVE it to your desktop or elsewhere on your computer. Include your last name and assignment in the filename. EXAMPLE: “Jones-Mod 3 Worksheet”
2. SUBMIT your worksheet. (You should see a retangular blue “submit” button in the upper left corner of your screen.) This will enable your workshop coach to provide individual feedback to you.
3. POST your worksheet to the Discussion Forum in the module. This enables your colleagues to post feedback to you and you to provide feedback to them on their worksheets.
“How To” Help
How do I submit an assignment? (Links to an external site.)
How do I view assignment comments from my coach? (Links to an external site.)
Supporting Documents
- M3 Worksheet
- Worksheet Guidelines
- Worksheet exemplar
- Bloom’s verbs handout
- MCQ writing checklist
- MCQ flaws article
Module 4 - Integrating the Pieces
Module Preamble
Module Learning Objectives
- Develop a team formation plan
- Develop a peer evaluation plan
In this module you will integrate the materials you have created in the first three modules as you begin to plan the whole course experience. You will formulate our plans for both team formation and peer evaluation.
Module Tasks (3.5 hours)
- Complete readings (120 minutes)
- Watch Video (3:10 minutes)
- Read Forming Teams (10 minutes)
- Complete Final Steps worksheet (60 minutes)
- Post in discussion forum and respond to colleagues post (15 min)
Forming Teams
A remarkable aspect of TBL is that teams often don’t need to be managed at all. Unlike other forms of group learning, lecturing on group dynamics and assigning specific roles to team members is simply unnecessary. The combination of thoughtfully-created teams and the focus on decision-making activities eliminates the need for any kind of team management. This is because shared activities and goals, the sequence of TBL activities, and accountability to one’s team all synergistically aid in the development of team cohesion.
There was a remarkable study that highlights the amazingly rapid development of team cohesion in TBL (Michaelsen, Watson, & Black, 1989). The study found that in early Readiness Assurance testing,student teams often used simple votes on split decisions and let the majority rule. But as team members found their social feet within the team and team cohesion began to increase with each testing cycle, the decision-making process progressively switched to a more consensus-based decision-making process. It showed that in as few as four Readiness Assurance cycles, teams had switched strategy from majority rules to consensus-based decision-making.
Creating Teams in Small Classes
In smaller classes with reasonable classroom space, you can simply line the students up and count off teams.The questions and criteria you choose to use to order the line depends on who your students are and what assets and liability you want to distribute across all teams. You can use questions to quickly order the line, such as: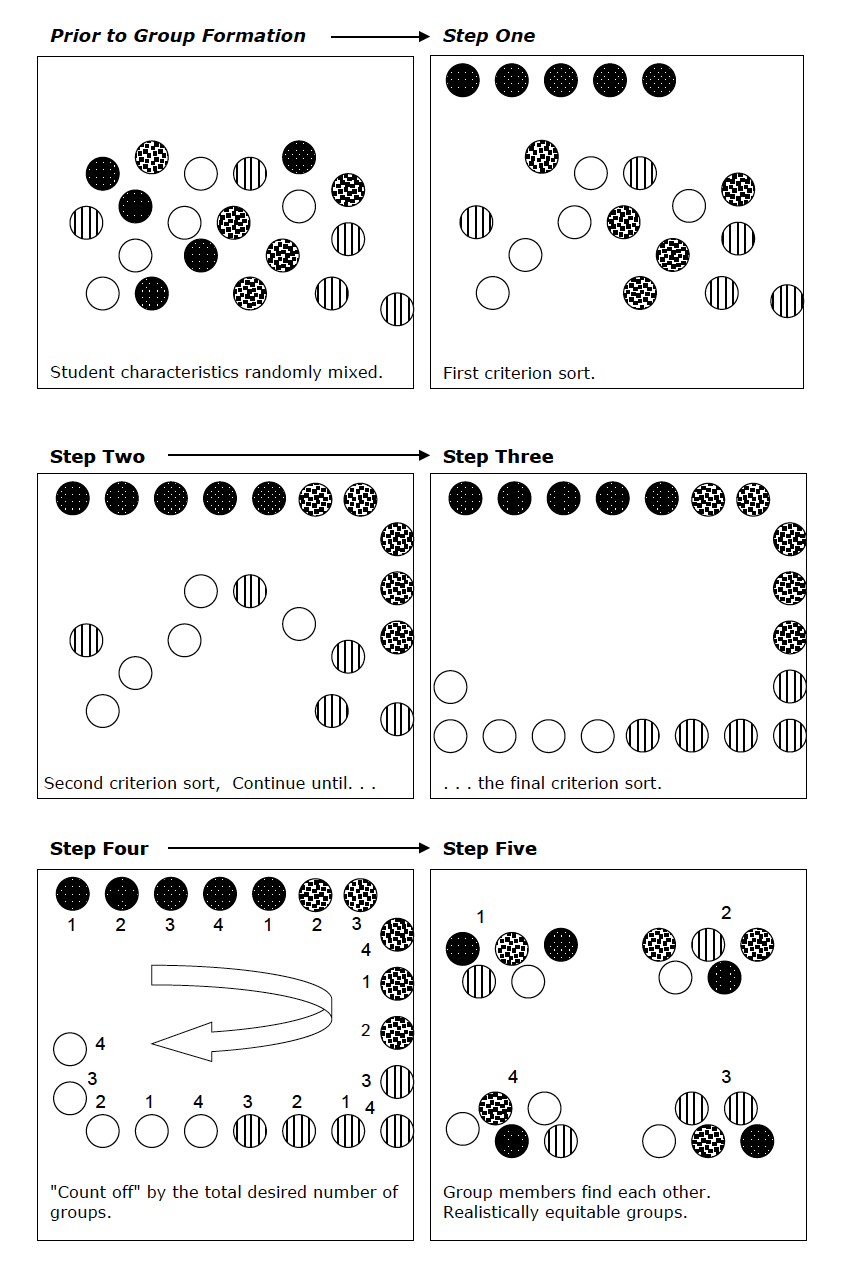
- “I want everyone with work experience at the front of the line”
- “With the remaining students not yet lined up, who has a previous degree? Please line up behind them”
- “With the remaining students not yet lined up, who has lived overseas? Please line up behind them”
- “Everyone else line up at the end of the line”
Students will often fit into multiple categories, but you will begin the line with the categories that are most important for team success. This is not an exact process and doesn’t need to be. You are creating diverse teams with a range of talents. Once the students are in the line, you do the simple math of how big the class is and how many teams you can have with five to seven students on each team. Once you know the number of teams you want, you simply count off the teams.
For example, in a class with 42 students, you have decided to have 7 teams with 6 students on each team. Now you would count off from the start of the line: 1, 2, 3, 4, 5, 6, 7, 1, 2, 3, 4, 5, 6, 7 until you run out of students. Don’t worry about being exact. The literature shows that randomly-formed teams perform almost as well as teacher-formed teams. So there’s no need to obsess over every last student getting into the exact right group. You might keep track of your most important sort criteria and do a few last-minute shuffles that might be necessary to get teams of equal strength. As an example, in a foundation engineering course, we might shuffle a few people at the end of the team formation process to ensure that each team has both a geological engineer and someone that is good with math.
This simple procedure has been used with great success in TBL classrooms for over 30 years. It might feel like it takes up valuable class time, but students really seem to enjoy the team formation process, and it is important that students know the teams were formed fairly and transparently. Once teams are formed, students will sit back down with their team, and we will give them a few minutes to do introductions inside their teams. Some teachers will at this point also ask the teams to come up with a team name.
Creating Teams in Large Classes
In large classes, it is often impractical or impossible to line the students up around the room. We then use an online survey to gather some student information that is used to order students in an Excel file, for example.
We often use online survey tools in a Learning Management System (LMS), such as Blackboard, Canvas, or Moodle, to gather the information. This must be set u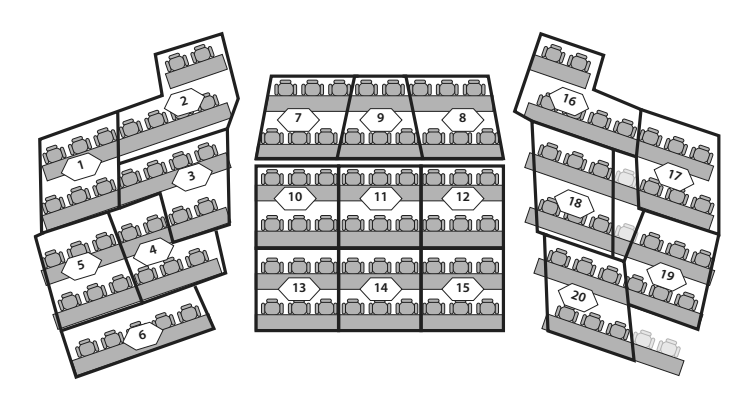 p as a quiz, since with a survey we cannot trace specific responses to specific students (I will use the word “survey” with the students to stress the non-graded nature of the quiz). We decide on the assets and liabilities that need to be distributed across the teams. We ask a series of questions to find out more about these assets and liabilities in our students. For instance: what is your major? Do you have work experience? Have you lived overseas? We ask whatever questions we feel are necessary to get the information needed to build balanced and diverse teams. Sometimes we want to make sure each team has someone with work experience, someone that is good at stats, or who has a laptop they can bring to class. Once we have the student responses, we perform nested sorts in Excel to order the list, and then we simply count off the teams.
For example, I download the survey/quiz results for the 180 students in my course. Then I build a sortbased on the column order that I feel is the most important, first sorting on most important criteria, then on second most important, then on third…etc. This kind of sorting is extremely simple in Excel™. You can sort by multiple columns by simply using the + control on the Excel™ sort dialog box and adding columns in the order from most to least important. Below is a image of the sorting dialog box from Excel™. In this example, I first sort on work experience, then previous degree and finally gender. This lets you in one simple step do a sort that is similar to ordering the line of students in the classroom.
Once sorting is complete, I simply count off on the Excel™ table. In the case of this course of 180 students, I may decide to do 30 teams of 6 students. Next, I would count down the sorted Excel™ results numbering the students 1, 2, 3, and up to 30, and then repeating the 1 to 30 numbering as needed for the entire class list. The list is then sorted into alphabetical order by student name, and the resulting roster of teams 1-30 is posted to the LMS.
When using any team formation method that isn’t done in front of the students, you should inform them of the procedure you used to form the teams. Students need to feel that the teams were fairly created.
Students will need to know where to find their team in large classrooms. To help with this, we create classroom maps that show exactly where each team should sit (see figure below). We post this along with the team assignments in the course website or LMS before the first Readiness Assurance test. We also display this map on the classroom screen when students are arriving at the first Readiness Assurance test, so they can find the correct place to sit. In large classes, we have students sit with their teams right from the start. This prevents any disruption at the end of the individual Readiness Assurance Test from students changing seats.
Readings
These readings will start you thinking about the whole course experience, a team formation plan, and a peer evaluation strategy. These readings will take approximately 2 hours to complete.
Reading One
The short 3 page reading introduces you to some course organization and course level policy considerations.
- Read Getting Started with Team-Based Learning p 25-26
Reading Two
This chapter chronicles the whole course experience so you can begin to imagine how all the pieces will integrate and how you will manage the classroom experience for the students.
- Read Getting Started with Team-Based Learning p 27-44
Reading Three
This chapter describes how to form and properly manage TBL teams.
- Read Getting Started with Team-Based Learning p 65-72
Reading Four
This chapter describes the importance of accountability. It will help you develop your grading scheme, make a decision of whether to grade 4S activities and learn more about peer evaluation, so you can pick a method that is right for your context.
- Read Getting Started with Team-Based Learning p 148-157
Worksheets
Time to begin completing this modules worksheet.
Using the Final Steps guidelines and worksheet, you will complete your own team formation and peer evaluation plan. You should spend about 75 minutes completing this worksheet.
To help you understand what we are trying to achieve with this worksheet, here is a worksheet exemplar from the module I am developing on “Learning Theory”
To help you understand where we are headed, here is the complete “Learning Theory” module compiled from the worksheets.
Instructions
When you complete your worksheet, be sure to
1. SAVE it to your desktop or elsewhere on your computer. Include your last name and assignment in the filename. EXAMPLE: “Jones-Mod 4 Worksheet”
2. SUBMIT your worksheet. (You should see a retangular blue “submit” button in the upper left corner of your screen.) This will enable your workshop coach to provide individual feedback to you.
3. POST your worksheet to the Discussion Forum in the module. This enables your colleagues to post feedback to you and you to provide feedback to them on their worksheets.
“How To” Help
How do I submit an assignment? (Links to an external site.)
How do I view assignment comments from my coach? (Links to an external site.)
Supporting Documents
- M4 Worksheet
- Worksheet Guidelines
- Worksheet exemplar
Course Close
To end course, the students post one last time in discussion forum, saying goodbye. Normally, they express thanks for course experience, the facilitators feedback, and other students helpful comments.
The facilitators last post should be one of thanks everyone for efforts and be a message of inspiration, courage, and caution that helps students see next steps in getting from online course end to classroom implementation.
Supporting Documents
- M1 Worksheet
- Worksheet Guidelines
- Worksheet exemplar
- Bloom’s Taxonomy Action Verbs
- M2 Worksheet
- Worksheet Guidelines
- Worksheet exemplar
- M3 Worksheet
- Worksheet Guidelines
- Worksheet exemplar
- Bloom’s verbs handout
- MCQ writing checklist
- MCQ flaws article
- M4 Worksheet
- Worksheet Guidelines
- Worksheet exemplar
- Complete TBL module exemplar
Supporting Videos
\
