Creating Teams in Large Classes
In large classes, it is often impractical or impossible to line the students up around the room. We then use an online survey to gather some student information that is used to order students in an Excel file, for example. We often use online survey tools in a Learning Management System (LMS), such as Blackboard, Canvas, or Moodle, to gather the information. This must be set up as a quiz, since with a survey we cannot trace specific responses to specific students (I will use the word “survey” with the students to stress the non-graded nature of the quiz). We decide on the assets and liabilities that need to be distributed across the teams. We ask a series of questions to find out more about these assets and liabilities in our students. For instance: what is your major? Do you have work experience? Have you lived overseas? We ask whatever questions we feel are necessary to get the information needed to build balanced and diverse teams. Sometimes we want to make sure each team has someone with work experience, someone that is good at stats, or who has a laptop they can bring to class. Once we have the student responses, we perform nested sorts in Excel to order the list, and then we simply count off the teams.
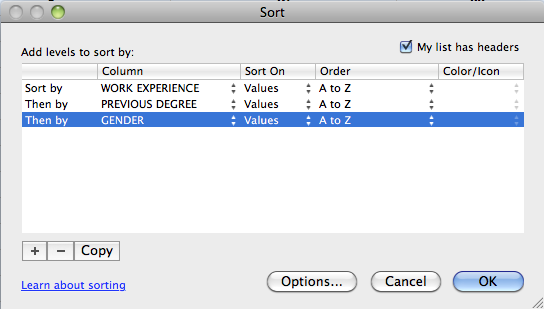
For example, I download the survey/quiz results for the 180 students in my course. Then I build a sort based on the column order that I feel is the most important, first sorting on most important criteria, then on second most important, then on third…etc. This kind of sorting is extremely simple in Excel™. You can sort by multiple columns by simply using the + control on the Excel™ sort dialog box and adding columns in the order from most to least important. Below is a image of the sorting dialog box from Excel™. In this example, I first sort on work experience, then previous degree and finally gender. This lets you in one simple step do a sort that is similar to ordering the line of students in the classroom.
Once sorting is complete, I simply count off on the Excel™ table. In the case of this course of 180 students, I may decide to do 30 teams of 6 students. Next, I would count down the sorted Excel™ results mbering the students 1, 2, 3, and up to 30, and then repeating the 1 to 30 numbering as needed for the entire class list. The list is then sorted into alphabetical order by student name, and the resulting roster of teams 1-30 is posted to the LMS.
When using any team formation method that isn’t done in front of the students, you should inform them of the procedure you used to form the teams. Students need to feel that the teams were fairly created.
Students will need to know where to find their team in large classrooms. To help with this, we create classroom maps that show exactly where each team should sit (see figure below). We post this along with the team assignments in the course website or LMS before the first Readiness Assurance test. We also display this map on the classroom screen when students are arriving at the first Readiness Assurance test, so they can find the correct place to sit. In large classes, we have students sit with their teams right from the start. This prevents any disruption at the end of the individual Readiness Assurance Test from students changing seats.